Pages

Wednesday, November 18, 2015

Recipe Monday 2 -- Pumpkin Pie!

How many slices of pie does it take before you deem a pie safe for others to consume? Ummmmm..... that would be THREE slices for me, and I declare this pie now safe for human consumption!  LOL And, I prefer my pumpkin pie chilled. The flavors just seem to meld better.

I couldn't wait until next Monday to share this recipe. Besides, I had all that beautiful pumpkin puree just waiting to get invited to the dance.

You will need a scale to weigh out your pumpkin puree. I always weigh out my ingredients and forgot this time to put it into a measuring cup for the exchange. I will say that it took a big chunk out of my Ball jar that is a pint and a half.

I love cooking and baking and strive to eat as healthy as possible. Eliminating added sugar is my other goal so if you've been reading my blog for any amount of time, you have noticed that I use alternate forms of sugar such as Whey Low sugar or Xyla all natural sweetener which is low carb, low calorie, and diabetic friendly. You can always substitute real sugar in any of my recipes. I try to always mention what I used for a particular recipe. For this recipe I used Xyla (note to never allow any of your furry animals access to this sweetener. It is toxic to them.), and it is not a super sweet pie which works for me because my tongue is much more sensitive to sweet now.

Pumpkin Pie

Ingredients:

  • 1 - 9 inch unbaked deep dish pie crust
  • 3/4 cup sugar or sugar substitute (I used Xyla)
  • 1 teaspoon ground cinnamon (I used slightly more...love cinnamon!)
  • 1/2 teaspoon salt
  • 1/2 teaspoon ground ginger (I used slightly more)
  • 1/4 teaspoon ground cloves 
  • 2 eggs
  • 15 ounces of pure pumpkin puree
  • 1 - 12 oz can evaporated milk
Directions:
  1. Preheat oven to 425 degrees.
  2. Prepare pie crust.
  3. Combine sugar, salt, cinnamon, ginger, and cloves in small bowl. Beat eggs lightly in separate bowl. Stir in pumpkin and sugar and spice mixture. Slowly stir in evaporated milk.
  4. Bake for 15 minutes.
  5. Reduce oven temperature to 350 degrees and bake for 60 minutes or until knife inserted near center comes out clean.**
  6. Cool on wire rack for 2 hours or overnight if made in the evening. Refrigerate.
Enjoy!

** Note. I needed to bake my pie for approximately 75 minutes which is a long time. I think the fresh puree set up slower. I just kept checking it every 10 minutes until the center had set. Next time, I will cover the edges of the pie crust so that it doesn't get as brown. It didn't burn but is browner than I like.

Bon Appetit!

Monday, November 16, 2015

Recipe Monday -- Pumpkins!

It's pumpkin time and they are popping up everywhere here. This weekend I splurged and bought two beautiful ones. One larger one for us and one smaller one for the girls in the coop! They are in their resting mode which means no eggs for a while. I thought they would enjoy a good pumpkin as much as we do.

If you have ever tried to cut open a pumpkin, you know it's like putting your life or rather limbs/digits in jeopardy. They are just rock hard. Thankfully, the smaller one was hard but we (actually dear hubby) chopped it into four sections (one for each girl). This big one however went into the oven whole after jabbing a few stab holes in the top.

I think everyone should bake a pumpkin some time in their life. It smells amazingly warm and earthy in the house while it cooks and it really is not difficult. Wanna try it?

Ingredients:

  • 1 pumpkin (ours was a cinderalla pumpkin which is regarded as a superior dessert pumpkin in the culinary world for its moist, thick flesh and custard like sweet flavor).
Directions:

  1. Preheat oven to 350 degrees.
  2. Carefully jab several stab holes along the top of the pumpkin. I think we went for about 7 stab holes on our big guy.
  3. Place pumpkin on a cookie tray that has been covered with reynolds wrap.
  4. Bake until a knife can be easily inserted into pumpkin. Ours took 1-1/2 hours. Make sure to check both sides of the pumpkin for tenderness. One side of our pumpkin had a thicker wall and it added about 15 more minutes before it was tender. If your pumpkin is small, start checking after 45 minutes.
  5. Remove pumpkin from oven and slice in two. This is really easy to do now. Be careful though, it will release hot steam and juices. Allow to cool for about 20 minutes.
  6. Remove stringy stuff and seeds into a bowl (don't throw away the seeds!).
  7. Remove outer skin from flesh and put pumpkin flesh into a bowl. Continue this process until all of the pumpkin has been skinned.
  8. In small batches puree flesh until smooth and creamy.
  9. Enjoy your beautiful puree in any recipe that uses pumpkin from a can. Fresh is is soooooo much better and no bpa concerns to worry about.
Seeds:
  1. Preheat oven to 400 degrees.
  2. Rinse the seeds and stringy stuff in a colander and most of the seeds will float to the top. Keep scooping out the seeds to a bowl until you have them all. Some of the seeds like to cling to the stringy stuff. I just pulled them away from it. Although, I've read that some people keep some of that attached and bake them with the seeds. I used only the seeds.
  3. Spray cookie tray with canola oil or dribble some olive oil on the tray. Spread seeds on the tray so that there is a nice single layer of seeds.  Sprinkle seeds with sea salt and toast seeds for 10 to 20 minutes until lightly browned.  Small seeds brown fast so keep an eye on your seeds. You don't want them to burn. My seeds were big and took the whole 20 minutes. The last 7 minutes, I stood at the oven and kept moving them around so they didn't burn.
  4. Put toasted seeds in a bowl and enjoy! Don't cover them with anything. They will keep for days if they last that long.  :)
Freshly cut after baking and starting to cool:
Beautiful chunks of pumpkin:
Starting to puree:
Can you almost smell it?
The results! Isn't it just beautiful. I just love that pure orange color.
Rinsed seeds ready to toast!
I'll post some recipes soon that will be using my puree.  I kept some in the fridge and froze three of the jars for later.

Here is a picture of what was left afterwards. Yes, the girls gobbled up the warm stringy stuff like it was candy!


Bon Appetit!


Thursday, November 5, 2015

More Half Square Triangle Play

In case you missed my post about half square triangles, you can read it here. After much playing and matching units on the floor, I still ended up with extra hst units. And that is after having enough to do 33 more ships and approximately 35 pinwheel units. I think those are going to be joined together for a fun and comfy quilt that will be perfect when relaxing in our recliner and watching football.

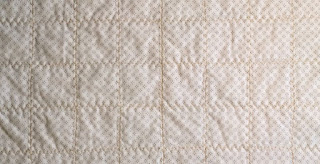
So, what to do...what to do. My baby dog (he's 10 but he's still my baby dog) has a store bought placemat for his water and food. As I was looking at it, I thought hey, what about a custom placemat for Dilly too. I really liked the staggered placement of the squares. I ended up making it 22 inches by 15 inches which actually is a perfect size for people placemats too. I may have to now make us some! Once I was done putting the top together, I used one of the beautiful stitches on my Bernina 770 along with the 1D foot and stared at the line in the foot when quilting it. I made the stitch as long and as wide as it would go and I love how it turned out. And as fate would have it, I had just enough leftover binding from my Piecing through the Decades quilt to bind it. Waste not, want not! I'm so glad I kept that little bit of binding and didn't toss it.

Here's a picture of the back so you can see those cool stitches.
I still have a few more hsts leftover. I'm thinking mug rugs may be in my future!  LOL

Sunday, November 1, 2015

Introducing Arabella

If you have been following me this year, you know that 1) my husband and I lived through a lengthy home remodel, which made it difficult to blog, live, eat, and definitely sleep! and 2) I designed a quilt using three shapes (diamond, triangle & hexagon) and have been teaching it as a mystery block of the month class locally.

Please allow me to introduce you to Arabella. The picture above is the culmination of the last nine months of classes, and on Saturday, I unveiled her all sewn together with her layout and passed out October's pattern. It was a wonderful class as nearly every student was able to attend. If any non-quilters would have been walking outside our building, I'm sure they would have been wondering what in the world was going on in there as the volume of our voices got louder and louder as we got caught up, had show n-tell and then worked on blocks and talked about how each person was planning on finishing.

English paper piecing (EPP) may seem intimidating especially when some quilts are completely put together with it and may be 7 to 10,000 pieces or more. My goal was to design a quilt that was doable for anyone, enjoyable even for the most of advanced students, and just challenging enough to keep interest but not so much to have a student give up. I feel like I met my goal. The triangle was the most difficult shape in this quilt because of its small size, but the quilt top would not be nearly as beautiful as it is without that shape.

There is one more row to be added to the bottom (October, November, and December) and then the last borders will be added. It's been a fantastic ride for me, and I cannot wait to offer the pattern to everyone in 2016.

There will be videos available to help you as well as many up-close pictures of me progressing through the blocks. Don't let not having done paper piecing stop you from having your own version of Arabella. I hope you will consider adding Arabella to your must have patterns for 2016.

What do you think? Are you ready for an 2016 adventure in paper piecing? This project really is a fun and addicting way to get started with EPP without committing to a project that takes thousands of shapes and years to finish.